Showing posts with label chrome. Show all posts

Tuesday, 5 March 2013

PostToTumblr v3.18 - Fixed Tumblr oauth change

head


Just a quick update to say I have now fixed the authentication issue my PostToTumblr that quite a few people contacted me about.

What was going on was that Tumblr appear to have changed the format of the data they return from a token request which was causing a library that PostToTumblr relies on to fail.

Before PostToTumblr can post content on a users behalf it first must get an "access token". This token is given to PostToTumblr as part of the authentication flow.

When PostToTumblr first starts up it checks to see if it still has a valid token (they can expire over time and other various reasons). If it doesnt it must go through the authentication flow. Firstly it redirects the user to the grant permission dialog:

screenshot_02

When the user clicks allow Tumblr then returns an "oauth token" and an "oauth verifier" to PostToTumblr, which it can then use to get an "access token" which is used to do the posting.

The problem that this update fixed was that the "oauth verifier" that was returned from Tumblr changed:

screenshot_03

You see at the end of the query string there is now a "#_=_" well this was causing havoc with the URL parameter parsing code in the Google oauth library I was using.

My solution is quick and dirty, just strip out the "#_=_" from the url while parsing:
// MIKE HACK!!	  
if(param.indexOf('oauth_verifier=')!=-1)
{
param = param.replace('oauth_verifier=','');
param = param.replace('#_=_','');
decoded['oauth_verifier'] = ChromeExOAuth.fromRfc3986(param);
}
else
{
var keyval = param.split("=");
if (keyval.length == 2) {
var key = ChromeExOAuth.fromRfc3986(keyval[0]);
var val = ChromeExOAuth.fromRfc3986(keyval[1]);
decoded[key] = val;
}
}


Well I hope this helps anyone else that may encounter this issue too!

Sunday, 20 January 2013

Post To Tumblr v3.13

head

Just a quick update to my Chrome Extension PostToTumblr this morning to fix a few things and add a couple of features after the large update in v3.12.

The change log:
- v3.13 -- 20/01/13 
+ More one-click options for post state, tags and caption
+ New button in the options for resetting Tumblr auth
+ New button for formatted posts for posting to draft
+ Fixed it so you no longer have a menu on one-click if you only have one blog
+ Correct verbs are now displayed in the desktop notifications when posting
+ Fixed an issue with white pages if you rename your blog

Sunday, 13 January 2013

PostToTumblr v3.12 Update

head

I have finally found some time to do a long overdue update to my popular Chrome extension PostToTumblr built using Haxe. 30,000 people currently have the extension installed and they post about 10,000 images, links, quotes per day so I thought it was about time to give it some love.

The list of improvements are:
+ One-Click posting now available in the options
+ Tall images now no longer appear off the screen
+ Notifications now used instead of popups
+ Improved error detection
+ Improved authorization process

The main feature in the update is the one-click posting. This much-requested feature was available in the original PostToTumblr but for various reasons never made it into the latest reincarnation.

screenshot_01

Once enabled in the options it enables the user to bypass the post preformatting window that usually pops up and instead posts with some default settings. If you have more than one blog the post menu gives you the option for which blog you would like the post to go to:

screenshot_05

The normal popup "posting.." window has been replaced with HTML5 notifications.

screenshot_02

This should make posting a smoother, less intrusive process.

If you haven't got the extension already you can grab it on the Chrome Store else Chrome should auto-update the extension for you very soon!

Saturday, 29 December 2012

Recursive, Nuts & Bolts Part 3 - Rendering the Results (3 of 3)

screenshot_01

This is part two of my three part series on the internals of Recursive, an extension for Chrome. In the first post I talked about the general structure of Recursive and some of the lessons I learnt from dealing with Typescript. In the second post I discussed how Recursive goes about crawling and parsing the web. In this, the final post, i'm going to talk about how Recursive represents, lays out and renders that crawled data on the screen.

Code Structure


As mentioned in the first post in the series I have tried to keep the rendering logic as separate as possible from the actual crawling logic. This separation between the renderer and the crawler makes things simpler to understand in the code. The crawler is a model and the renderer is the view. The renderer simply displays whatever state the model contains.

Representation


The question how to represent all the masses of data that the crawling process generates was tricky to decide upon and took quite a bit of tinkering before it ended up in its current form. I first toyed with the idea of displaying the data as a simple list of links where each list represents the next depth in the recurse, I demonstrated this concept in an early video:


The problem, as can be seen in the above, is that there is still far too much data to display in that manner. I also wanted something that was more immediately visual, something that lets you see relative importance of nodes in the graph at a glance, simple lists of links couldn't provide this.

I remembered when I first launched Chrome Crawler a while back someone sent a video in which they had cleverly used Chrome Crawler and the open-source graphing program Gephi to great effect:


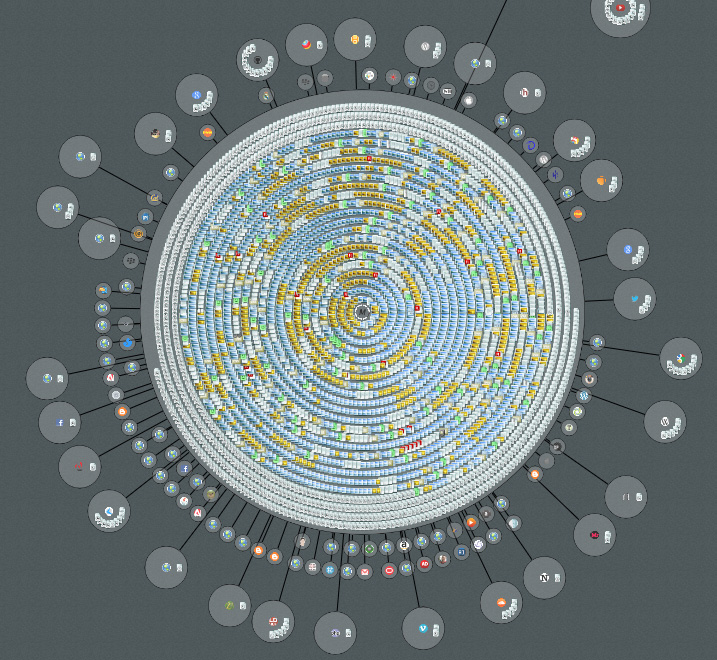
When thinking about the problem of how to represent the data I was aware that a key difficulty was representing the relative importance of nodes and edges in the crawl graph but not to swamp the user with too much information. I eventually decided that grouping pages and files together under the domains that the crawler found them would be a good way of giving a sense of the relative size of each domain and the number and type of files found there.

screenshot_02

Nodes, I decided, would be joined by a single line from the parent domain that crawled it. This way there wouldn't be too many confusing lines on the render yet you could still see how various domains were connected.

Layout


Once I had the idea how I was going to represent the data from the crawler it was then a matter of working out how to lay out the nodes. I knew that the nodes were going to be circles and I knew that I didn't want them to overlap, I also wanted a dynamic looking graph (like the one in Gephi video above).

To achieve this I decided to use Box2D the popular physics engine to take some of the difficulties with positioning away for me. Using Box2D each edge between the nodes is a distance joint and the nodes themselves are simple circle shapes. Then I just let the simulation run and the nodes move and naturally try to separate from each other.

screenshot_03

This solution worked in some situation however it was sub-optimal in others. The problem is that because each crawl is different you can end up in situations where there are many small nodes grouped about a parent or a few very large nodes:

ScreenHunter_01 Dec. 27 12.49

I spent a good long while trying to ‘frig’ it so that the length of the distance joints between the nodes were right in most instances so that the nodes didn't overlap. The code was starting to look really messy and complex incorporating rules that depended on the number of children / siblings, the relative size of the nodes, the total length of the sibling nodes, the area values with proportion to the total area and so on.

No matter how many times I multiplied here, divided here I couldn't hack it into a form that worked for every crawl. So I decided to go back to the drawing board and rethink the layout problem.

ScreenHunter_02 Dec. 27 12.54

After some scribbling I decided that what I needed to calculate was the total amount of space required for a node and the amount of space its parent had to allocate to fit it. Once I could correctly calculate those two it should be a relatively simple matter of spacing child nodes correctly about their parent.

I also noted that each node’s required area is simply the recursive sum of the space required by its children:

ScreenHunter_03 Dec. 27 12.59

At the smallest scale the total space required by a single node is just its radius. If you add a child to that node then total space required is the nodes radius plus a constant distance plus the diameter of the child.

ScreenHunter_04 Dec. 27 13.00

As you add more children however you run into the problem that there won't be enough space about the parent:

ScreenHunter_05 Dec. 27 13.02

So now you must layer those children into concentric rings so that there is definitely enough space for each child. So how to do that. Well that was the tricky part and required some trigonometry (just about the only thing I remembered from high school maths).

ScreenHunter_06 Dec. 27 13.13

Because we know the distance between the centre of the child and its parent and we know the radius of the child we can calculate the angle between two lines that extend from the parent and lie on points on the outside of the child’s radius and are perpendicular to the child's centre.

When we have this angle its a simple matter of looping through all of the (sorted smallest to largest) children adding up the angle required until you reach the maximum 360 degrees. Then you increase the distance between the parent by the diameter of the last node and start again on the second layer of children. This way you can guarantee that every child will have sufficient space about the parent.

ScreenHunter_01 Dec. 29 12.31

Rendering


I knew that the graph would get very large and would be complex to render so performance was critical. I didn't want to spend ages messing around with WebGL, having done some before I knew that potentially it could take a lot longer than the relatively simple canvas2d. Because Chrome has a hardware accelerated canvas2d I reasoned that the performance should be okay.

Unfortunately even on a decent machine, the rendering is still rather slow, so that you usually cant crawl beyond about a depth of 3. I tried all the common tips and tricks that can be found on the internet such as minimizing context switches when drawing lines and circles and caching commonly drawn things together in an image so that there are fewer draw calls. I even tried to assist chrome by putting the icons on one large image sheet, thinking it would be represented by a single texture behind the scenes thus minimise context switches when rendering to the GPU.

It seems however, that if you want performance in the browser you are going to have to go with WebGL.

Improvements


Given more time it would be nice to explore swapping out the 2d rendering pipeline with a purely 3d one using WebGL, that should increase the speed of things a great deal. One idea is I could use point-sprite particles to render each icon within a 3d graph with wireframe lines to represent the edges between the nodes.

I did some work on point sprite particles in WebGL a little while ago so I know it should be possible to render millions (literally) of nodes and edges that way.

Finally


Well thats the end of my series on the internals of Recursive, I hope you have enjoyed it. I haven't decided whether I want to release the source code just yet, I may return to the project in the future, but if you are interested in looking over the code send me an email: mike.cann@gmail.com

Thursday, 27 December 2012

Recursive, Nuts & Bolts Part 2 - Crawling the World Wide Web (2 of 3)

screenshot_05

This is part two of my three part series on the internals of Recursive, an extension for Google Chrome. In the first post I laid the groundwork for the contents of this and the next post. In this post i'm going to talk a little about what Recursive does internally once given  a URL.

Chrome Crawler


Recursive is actually based on an extension called Chrome Crawler I wrote about a year ago, but I had to change the name of due to Google's branding policy for Chrome Extensions. So although Recursive was rewritten from the ground up, a lot of the ideas discussed below stem from that project.

Cross-Origin XMLHttpRequest


Much in the same way that search engine crawlers work, Recursive, downloads a url, scans it for links then recursively follows them.

Normally this sort of behaviour isn’t permitted to Javascript (or Flash for that matter) when running within a web page due to the Same Origin Policy without specific permission from the server you are calling. Chrome extensions however don't have this restriction and thus (with permission given in the extension manifest) the extension is able to download content from any server.

This special behaviour is called the Cross-Origin XMLHttpRequest and is what allows Recursive to work its magic.

Code Structure


As briefly mentioned in the previous post the Crawling logic is separated from the Rendering logic. This differs from how Chrome Crawler was implemented where he rendering and crawling logic were mushed together. This separation took a little more thought and planning the result however is that the crawling logic makes much more sense and doesn't contain anything that doesn't purely pertain to the logic and data involved with crawling.

The crawling code is split up into three main files the Graph, the Crawler and the Parser.

screenshot_06

The Graph is the central class that drives the crawling process. Only one of these exists for the application. It provides a number of functions for starting, stopping and pausing the crawling process. It also has a number of events (exposed through signals) that it uses to let listeners (the renderer) know when a particular event occurs.

The Crawler represents a single crawl instance. Its responsibility is to follow a single URL then report when it progresses, returns or errors. The Parser takes the returned HTML from the Crawler and scans it looking for links and files. It then returns the results which are then stored in the Crawler instance.

Parsing Problems


One issue I encountered while developing Recursive (and Chrome Crawler) was the performance and security issues involved with parsing the HTML returned from the crawl. The way I originally handled this was to pass the entire HTML to JQuery then ask it for all ‘src’ and ‘href’ attributes:

[codesyntax lang="javascript" lines="normal"]
function getAllLinksOnPage(page)
{
var links = new Array();
$(page).find('[src]').each(function(){ links.push($(this).attr('src')); });
$(page).find('[href]').each(function(){ links.push($(this).attr('href')) });
return links;
}

[/codesyntax]

The problem with this is that behind the scenes jQuery is constructing a DOM which it uses for querying. Normally this is what you want, but in this instance its a problem because its rather slow process, also the browser executes the script tags and other elements when it generates the DOM. The result of which is the crawling is really slow and there were many security errors generated while crawling.

The solution was to use regex to parse the HTML and look for the attributes manually like so:

[codesyntax lang="javascript" lines="normal"]
var links = new string[];

// Grab all HREF links
var results = c.pageHTML.match(/href\s*=\s*"([^"]*)/g);
if (results) results.forEach(s=>links.push(s.split("\"")[1]));

// And all SRC links
results = c.pageHTML.match(/src\s*=\s*"([^"]*)/g);
if (results) results.forEach(s=>links.push(s.split("\"")[1]));

[/codesyntax]

I was worried that the sheer amount of html text that must be parsed by the regex would result in things being really slow however it seems to hold up quite well, and is definitely not the bottle neck in the app.

Custom File Filter


One addition to the result parsing that was added in v.1.1 was the ability to define a custom file filter:

Screenshot_002

Enabling this adds a third regex call into the results parser. Any matches are added to the Crawler’s files as a special kind of file. When the user opens the files dialog all the matches are shown under a special category:

Screenshot_003

Improvements


Although the regex doesn't take very long to execute when parsing the HTML I had the thought that Javascript workers could be used to take advantage of the multiple cores that are present in most CPUs these days. Perhaps if I decide to perform some more complex sort of parsing i'll revisit this idea.

Finally


Thats about it for part two of my three part discussion on some of the internals of Recursive. Head over to the third part to find out more about the layout and rendering of the returned data.

Sunday, 23 December 2012

Recursive, Nuts & Bolts Part 1 - A Typescript Chrome Extension (1 of 3)

screenshot_04

As promised I have decided to write a few blog posts on some of the technology behind my recently release Chrome extension Recursive.

Because there is quite a lot to cover, the discussion is going to be split over three posts. The first part is about the structure of the extension, Typescript and other tools and tech employed. The second will cover the actual recursing / crawling part of the extension. In the final part i'll talk about how I went about representing, laying out and rendering all the data that the crawling part generates.

With that out the way lets get on with the show..

General Page Layout


When a user open a new tab or browses a new page in Chrome a background script in Recursive inspects the URL you are visiting and so long as it is of type http:// or https:// it will add a small icon to the omni bar:

screenshot_02

Clicking this button opens up a new tab with the Recursive app inside. The app consists of a single HTML document “app.htm” with all of the logic split up into multiple Javascript files which mirror the Typescript files that were used to generate them (more on that below).

Twitter Bootstrap


Recursive is the first project I have had the opportunity to use Twitter’s Bootstrap. Bootstrap takes much of the pain (I tend to suffer from) out of generating a decent looking HTML interface. Because of it ubiquity it can cause a lot of sites to look very samey, for Recursive however I wasn't interested in spending all that much time making a unique looking interface so the default style suited me just fine.

General Code Structure


There are three main parts of the application; the HTML and its associated controlling logic (jQuery stuff), the crawling logic and the rendering logic. I have attempted to keep the three parts of the application as separate as possible. The reason being that hopefully it will make things easier in the future should I ever wish to swap out one of these features, for example swapping the canvas2d renderer with a 3d one.

Typescript Code Structure


I have already mentioned in a previous post that I took advantage of the new language Typescript from Microsoft to build Recursive. I won't reiterate the reasons I really like Typescript (I should be paid for my evangelizing :P), go check out my previous post if you are interested in hearing my thoughts on the language.

The way I have structured things in Recursive is to have a central context / entry point in the form of a file called app.ts. This file lives in the root of the project and I use it as a sort of globals file. I know, I know what you are thinking, “Globals! Mike, you should know better!”. In this instance however I think because Recursive is a standable app inside an extension it is unlikely to conflict with any other JS (supposing the libraries I use dont declare any global variables). Besides I don't like the alternative that involves using RequireJS or AMD due to all the magic strings and non-type safety involved.

screenshot_03

App.ts also contains references to every other typescript file in the app. This means that when a new TS file is created I only have to add a single reference back to app.ts and all the classes and types contained in the other files will be available (this solution actually feels kind of icky, much in the same way as globals do, but one of the samples on the Typescript homepage uses this ‘driver’ method so I guess its okay!).

One thing you have to remember with this 'driver' method is that every time you create a new TS file, you must also manually add the generated JS file to the html page. Also you must insert the JS files in the correct order in the page head else the types won't be available when the script is loaded. It would be nice if I could just have included app.js in the html page and then have all other .js files automatically added in the correct order for me. This is what RequireJS is supposed to do for you I guess. Another solution would be to use source-maps to map to the original Typescript code (when debugging in chrome) however I had a great difficulty with getting this to work in Chrome so decided to move on.

One important lesson I learnt while working with Typescript on Recursive and with working with JS in general is to try not to fight it too much. Just because you have type safety doesn't mean you HAVE to make everything type safe all the time, particularly if its going to take you hours to implement it in a type safe way. Just because you can separate all your classes out into separate files doesn’t mean you have to, sometimes it makes more sense and is easier to implement if a few enums or helper classes sit inside the same file.

L-System


Finally, as a little extra I decided to put in a splash screen when you first start up Recursive:

screenshot1

While designing this I was also trying to come up with a logo and name for the app. I was toying with the name Recursive and it got me thinking about fractals and L-Systems. As I am easily distracted I decided to quicky have a go at writing an L-System for the splash screen. It wasn't hard to implement but tweaking all the parameters turned out to be a lot more fun than I was expecting so I spent most of one Sunday evening just playing with it :P

Finally


Well that's about it for the first part of my discussion on the internals of Recursive. This post didn’t didn't contain too many details on what Recursive actually does and how it does it rather it was intended to lay the groundwork for those topics in the next two posts. So stick around for those coming up in the next few days!

Sunday, 16 December 2012

Recursive v.1.1

Screenshot_001

I have found a little more time this evening to fix some bugs and make some improvements to my Chrome extension Recursive. The changes are as follows:

----- v.1.1 ------
- Now only displays recursive icon on tabs with http:// and https://
- Full screen now works (uncommented that line of code, doh!)
- Pause and reseting a recurse now works correctly
- Renamed the title page of the app
- Some Performance improvments
- There is now an option in the settings to define a custom file filter
- There is now a setting to disable removing duplicate files


One of the main new additions is the ability to add a custom filter in the settings which recursive uses when parsing a file:

Screenshot_002

If any are found they are then displayed in the files dialog:

Screenshot_003

As I say, just a quick update this evening. I plan on writing some more in-depth blog posts this week explaining some of the nuts and bolts of Recursive.

Tuesday, 4 December 2012

Recursive - Explore the endless web


Wow, well that took longer than expected! 44 days ago I blogged that I had started work on a second version of my Chrome Crawler extension and have only just managed to get it to a state I was happy with enough to release it. To be fair I had been on a trip to New York during that period so perhaps I can be excused. Having said that however I think the time has been well spent and am fairly proud of the result.

TL;DR


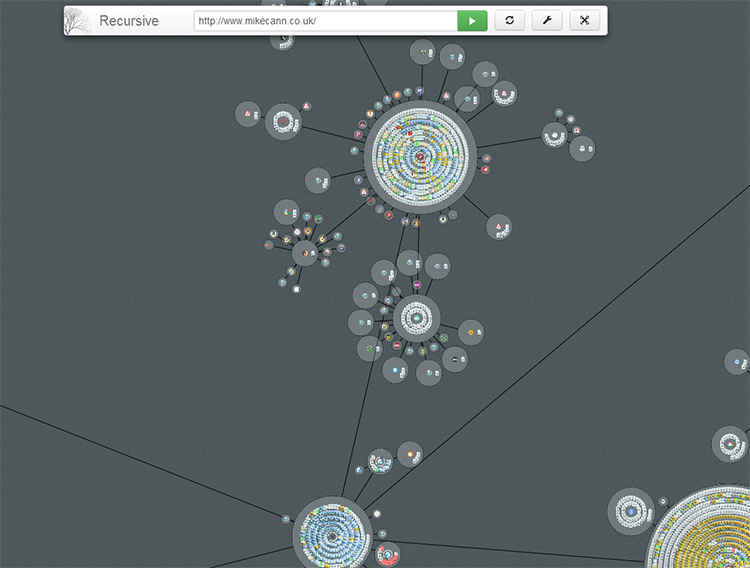
Recursive is an experimental tool for visualising the world wide web. Given a URL it downloads the page search for links and then recursively downloads those. The information is then displayed in a node-based graph.

The Name


So what's this all about? Why is it called 'Recursive', why not 'Chrome Crawler 2'?

Although I would like to have called the spiritual successor to 'Chrome Crawler', 'Chrome Crawler 2' Chrome's branding guidelines forbid using the Chrome name or logo (they brought this in since the launch of Chrome Crawler 1).

With that in mind I decided that rather bend Chrome Crawler's name and logo to fit the guidelines I would create a whole new logo, name and app. The app is a total rewrite from the previous iteration anyway so I thought it justified.

According to dictionary.com there is no definition for "Recursive" or "Recurse" but there is one for "Recursion":
2. the application of a function to its own values to generate an infinite sequence of values.

So a tool that downloads pages, follows the links on that page to download other pages seemed like a rather apt description of something that is "Recursive".

Video


Before I go much further, I put together this little video demonstrating some of the extensions core functionality:


Installing


Installing and upgrading is dead simple thanks to how Google Chrome's extension system works. Just head over to this link and hit install:

https://chrome.google.com/webstore/detail/recursive/hbgbcmcmpiiciafmolmoapfgegbhbmcc

Then to launch it visit any website and hit the little icon in the Omnibox:


How it works


Recursive works by taking in a starting URL which it uses to download the page it points to:


Once that page is downloaded Recursive parses it looking for links and files. If it finds things it thinks are files then it records them against that URL. It then proceeds to visit all the links in turn, downloading the page then parsing the for yet more files and links.

This cycle continues until a certain "depth" is reached which is the maximum number of links away from the starting URL. You can set the maximum depth allowed in the settings:


One of the key improvements of Recursive over Chrome Crawler is the way it visualises the data as it is returned:


Every page is grouped by its domain and is represented by a circular "node".


So for example "http://mikecann.co.uk/personal-project/tinkering-with-typescript/" would be grouped under the "mikecann.co.uk" domain. Any other pages found while running that match this domain are added as little page icons inside the host node.


Any files that are found on a given page are given an appropriate icon and added to that page's domain node.


As Recursive downloads pages and follows links it records the path it takes. It then draws lines between the nodes that are linked:


Interacting


Using the mouse wheel you can zoom in and out to get a better perspective. Click and drag to move about the recursive space. You can also run the app in fullscreen if you so desire.


If you click on a node it tells Recursive to explore that node for one extra level depth.

Right clicking a node opens a menu that lets you either open all the pages contained in that node or view the files for that node.


Files


By using the context menu for a node you can checkout all the files that Recursive found for that node. The files are separated into various categories which you can toggle on or off:


Then if you wish you can download all the files as a zip.

The tech


I think i'll leave this section for the next blog post as this one is long enough already.

If you would like specific info on the tech in the meantime however or have some suggestions for features then don't hesitate to contact me: mike.cann@gmail.com

Well that's about it hope you like it. I had a blast making it even if it did take alot longer than I was expecting. It doesn't have much purpose really but there is a lot of cool new tech in there, which is reason enough to make it surely?

Friday, 19 October 2012

Tinkering With TypeScript


In the spirit of David Wagner's try { harder } talk on 'the value of tinkering' I decided to do a little tinkering with a new language from Microsoft called TypeScript.

TypeScript attracted me for three reasons. Its the new project from Anders Hejlsberg the creator of C#, it brings type safety to JavaScript and im a sucker for new technology.

TypeScript is basically a superset of Javascript much in the same way C++ is to C. So every single JS project is a valid TS project. This is good if you are familiar with JS already, you should be able to pick up TS fast and then get to grips with the other cool bits it bring.

TS compiles down to JS much in the same way that that JS target of Haxe compiles down to JS. Unlike Haxe however the generated code is much more readable and so although there is no integrated debugger (yet) you can just use Chrome's developer console to debug with without too much pain.

Before I get too much more into the specifics of the language I want to mention the project I am tinkering with TS for. A while back I wrote an extension for Chrome called Chrome Crawler. It is a rather simplistic web crawler written in JS and released as a Chrome extension (because of the cross-domain scripting limitations with normal JS).

Over the intervening couple of years I have returned to the project on occasion with an idea to do a second version, however I never actually completed one. So I thought it may be nice if I gave it a go again but this time using TypeScript and at the same time see how it compares to the Haxe JS target.

Chrome Crawler v2 isnt ready for release but checkout the quick video I put together below to see how its coming along:


The original idea was to lay out the crawling in a left to right fashion. So each crawl depth is put in its own column, but as you can probably tell from the video above, things start getting a little unmanageable when you get to just level 3 of crawler depth. So I think im going to have to rethink how I display the nodes in the crawl graph. I have some ideas, but that's going to have to wait until I return from my trip to NY next week.

More on that in later posts, lets take a look at a few key TypeScript features:

Typing


One of the key features of TypeScript is that it allows you to structure your code in a type-safe way. You can declare Classes, interfaces (inequivalent to typedef in Haxe) and modules as types then use them later.

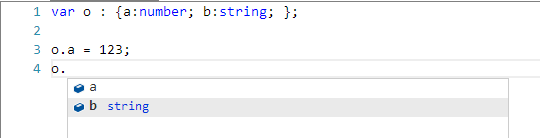
TS also has structural typing so you can define a structure as part of a function or variable definition without first declaring a Class or Interface for it. For example:


This is great for many reasons but the big one for me is the way it assists tooling particularly when coupled with the excellent VisualStudio 2012 you get all the things you would expect such as intellisense, go to definition, find references and refactoring. For me it takes much of the pain out of the dynamic nature of JS.

As with AS3 and Haxe typing is optional. You can if you wish declare everything as "any" (dynamic in Haxe or * in AS3). Doing so however would forfeit many of the strengths of TS.

Like Haxe you can 'define' things as being available at runtime, this means you can reuse existing JS libraries without having to totally rewrite them in TS. By declaring an "interface" you can just tell the compiler that this type will exist at runtime (we did this with extern's in Haxe) and thus you can use the existing library in a type-safe way. For example here is a definition for the Facebook SDK:

https://github.com/mientjan/typescript-facebook-definition/blob/master/facebook.d.ts

Alot of the type-safe TS stuff is familiar to me because of Haxe. I think some things in TS are nicer fit because its only designed to compile to JS unlike Haxe which can compile to many different languages. For example TS has function overriding baked into the language also strongly typed functions in my option are a little nicer:

[codesyntax lang="text" lines="normal"]

(index: any, domElement: Element) => any

[/codesyntax]

is a function type that takes in two params and returns anything (including void), its Haxe inequivalent:

[codesyntax lang="text" lines="normal"]

Dynamic -> Element -> Dynamic

[/codesyntax]

These things however are just my opinion, but it does tie nicely into one of my favourite features of TypeScript...

Lambda Functions


Lambda functions are basically syntactical sugar to anonymous function definitions so instead of:

[codesyntax lang="javascript" lines="normal"]

var fn = function(a, b) { return a+b; }

[/codesyntax]

You could write this as:

[codesyntax lang="javascript" lines="normal"]

var fn = (a, b) => a+b;

[/codesyntax]

Which is really nice when looping over arrays:

[codesyntax lang="javascript" lines="normal"]

var a = [4,2,1,6,5];
a.sort((a,b)=>a-b).forEach(i=>console.log(i));

[/codesyntax]

Because TS uses type-inference all the variables in the above are type safe. I really love how terse this syntax is and have had quite a few discussions about introducing it into Haxe.

There is one big difference between function() and lambda definitions however and that is the way they handle scoping of "this".

For example take this example from the javascriptplayground.com blog post:

[codesyntax lang="javascript" lines="normal"]

$("myLink").on("click", function() {
console.log(this); //points to myLink (as expected)
$.ajax({
//ajax set up
success: function() {
console.log(this); //points to the global object. Huh?
}
});
});

[/codesyntax]

This is a common gotcha in JS coding and the usual solution is to do something like the following:

[codesyntax lang="javascript" lines="normal"]

$("myLink").on("click", function() {
console.log(this); //points to myLink (as expected)
var _this = this; //store reference
$.ajax({
//ajax set up
success: function() {
console.log(this); //points to the global object. Huh?
console.log(_this); //better!
}
});
});

[/codesyntax]

In TypeScript lambda functions "this" is scoped to the block in which the lambda was defined so the above can be written more simply as:

[codesyntax lang="javascript" lines="normal"]

$("myLink").on("click", function() {
console.log(this); // points to myLink (as expected)
$.ajax({
success: () => console.log(this); // points to myLink
});
});

[/codesyntax]

this.


One minor thing that does annoy be about TS is the necessity to put "this." in front of every single member variable access. For example:

[codesyntax lang="javascript" lines="normal"]

class Crawler {
constructor(private url:string){}

crawl(){
console.log(url); // error
console.log(this.url) // okay
}
}

[/codesyntax]

Some may consider it rather minor but I find it annoying coming from a Haxe / AS3 / C# perspective where member variable access is implied. I guess the reasoning is because in JS if you dont supply a var before a variable declaration / usage you are referring to global scope, thus in that above example "console.log(url);" would be trying to log global.url which is undefined.

Tooling


The tooling support for TS is pretty good so far. Visual Studio has a plugin for the language and has reasonably good support. There is still quite a bit of room for improvement here however. Things such as integrated debugging, code generation for functions event handlers etc and source formatting would be nice.

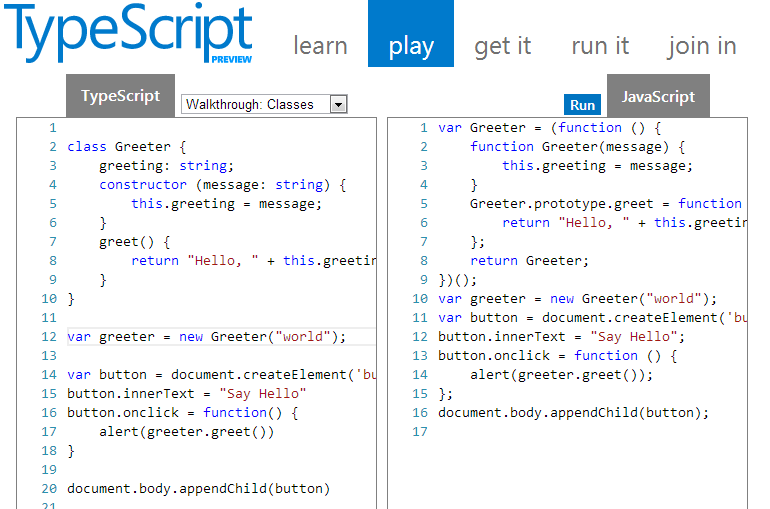
Because the TS compiler is written in TS they are able to create really cool things such as the TypeScript Playground:


With it you can mess around with TS and see its generated JS as you type. It even includes a version of intellisese for that type-hinting goodness.

Conclusion


I must admit I really like TypeScript. It provides a light-weight layer over the top of Javascript giving just enough of the type-safe goodness and language enhancements without making it totally alien to a JS coder.

The generated JS looks very similar to the source TS (and will look even more so once ES6 is mainstream) which is important when you are trying to debug a problem. I discovered this to be an important point when developing the Haxe version of my Post To Tumblr chrome extension. Haxe although awesome tends to generate alot of alien looking JS making it tricky to work out where to put a breakpoint.

More important than any particular nuance of the language however is who is backing it. Microsoft is a huge company with a massive following of developers. It pays many people to work on the language and evangelise it. What this results in is a much bigger community. A bigger community means you have more questions asked on Stack Overflow, more API definitions written and more job positions specialising in the language. Also having Anders Hejlsberg, the father of C#, behind it you can be confident that the language will continue to develop in a manner that (if you are a C# fan) makes sense.

I have been having a whole lot of fun in TypeScript, and have high hopes for its future.

Tuesday, 11 September 2012

All New Post To Tumblr Chrome Extension created with Haxe & Robotlegs


I have been working off and on for a while on an update to my popular Chrome Extension 'Post To Tumblr' and seeing as Tumblr have just changed thier API I thought it was time to accelerate its development and release it, finally.

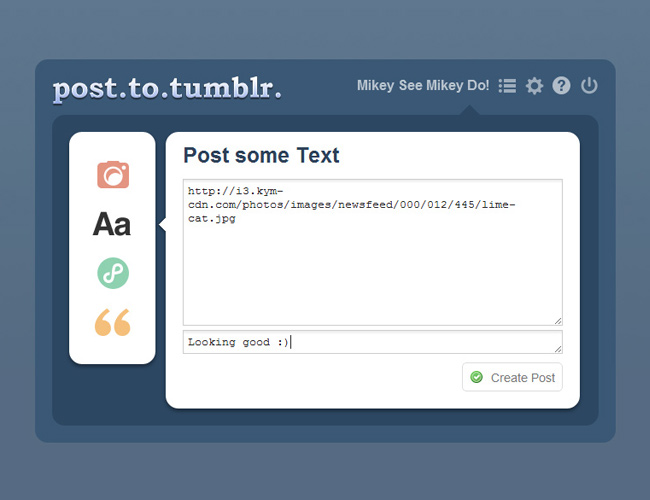
First some screenshots to give you an idea of what it does:


You can right-click any thing on a page and "Post To Tumblr".


A new tab opens where you can format it how you like.


You can change the post type very easily.


When done you just "Create Post"

This version is written totally from scratch using Haxe's Javascript target. Although not strictly necessary for something as simple as this I thought it was a good opportunity to experiment around with Haxe's JS capabilities. I must admit I was pleasantly surprised at how well it worked.

Most stuff just worked. There are also plenty of externs out there for the popular Javascript libraries on lib.haxe.org such as the "chrome-extension" library.

Having type-safe Javacript is great for for so many reasons that im not going to get into here. I must admit however there were times when I was lazy and didn't want fancy creating a type-safe extern class for a library. Fortunately however Haxe has a mechanism for the lazy coder in the form of "untyped".
An example of this is the way in which you access the "localStorage" object in chrome extensions. localStorage is basically a global object that you can set keys and values in and will persist for the life of your extension. To access it you use: "localStorage[myKey]" to return a value. If you tried to do that in Haxe it would throw an error because Haxe has no concept of global variables (quite rightly).

So to access the localStorage you can use untyped to quickly get access to a global variable, I then decided to wrap this little hack in a Model class to make it a little neater:

[codesyntax lang="actionscript3" lines="normal"]
package models;
import js.Lib;

/**
* ...
* @author MikeC
*/

class ChromeLocalStorageModel extends BaseModel
{

public function get(key:String) : Dynamic
{
var val = untyped localStorage[key];
trace('Getting from localStorage: '+key+" :: "+val);
return val;
}

public function set(key:String, val:Dynamic) : Void
{
trace('Saving in localStorage: '+key+" :: "+val);
untyped localStorage[key] = val;
}

}

[/codesyntax]

This lets you just just mix and match the type-safe stuff when you need to and just do a little "hack" when you need to ;)

The above example also shows off another cool feature im using in Post To Tumblr, which is RobotLegs. Thanks to the fact that the RobotHaxe library is written in pure Haxe (has no platform specific bits) that means I am able to use it on a Javascript project.

The only problem is the issue with Views and Mediation. Because unlike Flash events don't bubble up to a central source there is no way to do automatic mediation in the JS target. Instead what you do is implement "IViewContainer" on your context view, then whenever a child is added or removed you call viewAdded() or viewRemoved() that way the MediatorMap can try to make a mediator for that view.

Im not sure if the way I have used RobotLegs is the correct or best way, it was more of an experiment as I went along. The way I have done it is to wrap many of the main HTML elements in my own view classes. So for example I have a "DivView" that represents a "div" and extends BaseView:

[codesyntax lang="actionscript3" lines="normal"]
class DivView extends BaseView
{

public function new(elementId:String=null)
{
super(Lib.document.createElement('div'));
if (elementId != null) element.id = elementId;
}

}

[/codesyntax]

BaseView implements the IViewContainer interface:

[codesyntax lang="actionscript3" lines="normal"]
class BaseView implements IViewContainer
{
public var viewAdded:Dynamic -> Void;
public var viewRemoved:Dynamic -> Void;

public var element : HtmlDom;
public var parent : BaseView;
public var children : Array;

....

public function new(element:HtmlDom)
{
this.element = element;
this.children = [];
isLayoutInvalid = true;
}

...

public function add(child:BaseView) : BaseView
{
children.push(child);
child.parent = this;
child.viewAdded = viewAdded;
child.viewRemoved = viewRemoved;
if(viewAdded!=null) child.addChildren();
element.appendChild(child.element);
if (viewAdded != null) viewAdded(child);
return child;
}

public function remove(child:BaseView) : Void
{
if (viewRemoved != null) child.removeChildren();
children.remove(child);
child.parent = null;
child.viewAdded = null;
child.viewRemoved = null;
element.removeChild(child.element);
if (viewRemoved != null) viewRemoved(child);
}

...

}

[/codesyntax]

Then say I want to construct the following html:

[codesyntax lang="html4strict"]
<div id="container">
<div id="inner">Hello World!</div>
</div>

[/codesyntax]

I would do something like this:

[codesyntax lang="actionscript3" lines="normal"]
class MainPopupContainer extends DivView
{
private var inner : DivView;

public function new()
{
super("container");

inner = new DivView("inner");
inner.element.innerHTML = "Hello World!";
add(inner);
}
}

[/codesyntax]

Then perhaps I want to turn the "Hello World!" red when clicked I would do something like this:

[codesyntax lang="actionscript3" lines="normal"]
class MainPopupContainer extends DivView
{
private var inner : DivView;

public function new()
{
super("container");

inner = new DivView("inner");
inner.element.innerHTML = "Hello World!";
add(inner);

new JQuery(inner.element).click(onInnerClicked);
}

private function onInnerClicked()
{
inner.element.style.color = "#FF0000";
}
}

[/codesyntax]

What this means is you have a RobotLegs-familiar looking View with a Mediator behind it (thanks to the mediation happening when you call add()) which is nice. What it does mean however is I have quite abit of boiler plate wrapping the HTML nodes, which definitely slowed down my development.

Another thing im not sure about is my mixing of in-line styles and stylesheets. Sometimes I would use the styles in my css and other times I would just set them on the element directly. To be honest, because I was using classes and inheritance and all that good stuff I usually found it easier and more expedient to set the styles inline in my View class rather than go digging through several hundred lines of css to find the selector I was looking for

For example I may have a "HeaderOptionButton" that defines some inline styles then whenever I wanted a button that looked and acted like a header button I would just make and add a HeaderOptionButton. I know im probably going to get flamed to hell and back for that!

As I said, im not sure if im doing it the "right" or "best" way, its just the way that seemed to work at the time ;)

Well that's a quick overview of where im at. Once I have cleaned the project up a little and added some missing features ill be sticking the source up on GitHub for anyone interested.

Wednesday, 22 August 2012

Mr Nibbles, Free on iOS, Android & Browser


Finally! Apple approved the iOS version of the game this morning, and this evening I finished off the site, so the holy trinity of game availability; iOS, Android and the browser is now complete!

Check it out:

app store
google play

or at: http://www.mr-nibbles.com


For once I actually finished one of my projects :) Im really happy with how the whole thing went, sure it went a couple of weeks over my original three-week estimate but still im happy with the result. Of course there is so much that could be improved, but for a free game made in a very short time I think it has done its job and shown what is possible thanks to Haxe and NME!

I hope to write a longer post-mortem post soon about the entire process and highlight any issues of the process itself. Stay tuned!